
Trailer Crush or Trailer Catfish? How to inspect a trailer for sale.
- Cindee Pazuros

- Aug 16, 2025
- 8 min read
Updated: Mar 31
Part 4 of Atomic Trailer Chicks Guide to Buying A Vintage Trailer
How to inspect a vintage camper so you don’t get stuck with a money pit.

Once you find a trailer you like (or can't live without), the inspection begins. Do NOT skip this part!
I would never, never buy a trailer sight-unseen. Always inspect your prospective trailer in person. I see posts of people buying adorable trailers on eBay or Craigslist without visiting or inspecting them. They were trusting that the condition was as-advertised. They go to pick it up, or have it delivered, and boy are they surprised. Trust but verify, is my motto.
Come with a towel or gardening pad (so you can get underneath), some work gloves, a flashlight, an ice-pick, and a screwdriver. It would be nice also to have a ladder to look at the roof. Be prepared to get a little dirty, hon!
Spend at least a 1-2 hours looking over and poking through the trailer. Take your time! It is a good idea to come back a few times if you have that opportunity. I bought a trailer once that looked really great inside and out, but I didn't spend enough time looking. I didn't notice the mismatched paneling until it was too late. I brought the trailer home, replaced the flooring then noticed some water stains. The stains prompted me to open up the paneling in the corner. I discovered much of the trailer paneling wasn't original, just very well matched patches. They had covered up old leaks rather than fix them, and didn't even do it properly.
Musty Smells - Note the smell of the trailer when you first walk inside. If it smells of smoke, it will probably always smell like smoke. If it smells of mildew or mold, you may have water leaks. If it smells of animals or sewage (eww), I shouldn't have to tell you what to do. Those smells don't ever come out, in my opinion. My sense of smell is my superpower. I am picky about smells, but if you don't like the smell of your trailer, don't buy it.
Foundation - You should start your inspection at the bottom, with the frame and sub-floor. Issues here are the most time-consuming, expensive and difficult to fix.
Inspect the metal frame underneath the trailer. Check that the frame is solid, not rusted out or broken. Be prepared to see a little surface rust on the frame, that is normal. However, metal should not be flaking off in chunks. It should not appear lacy or Swiss cheese-like. It should not be snapped at any seams or welds either.
A trailer with a snapped or bent frame is expensive to fix and dangerous to tow!

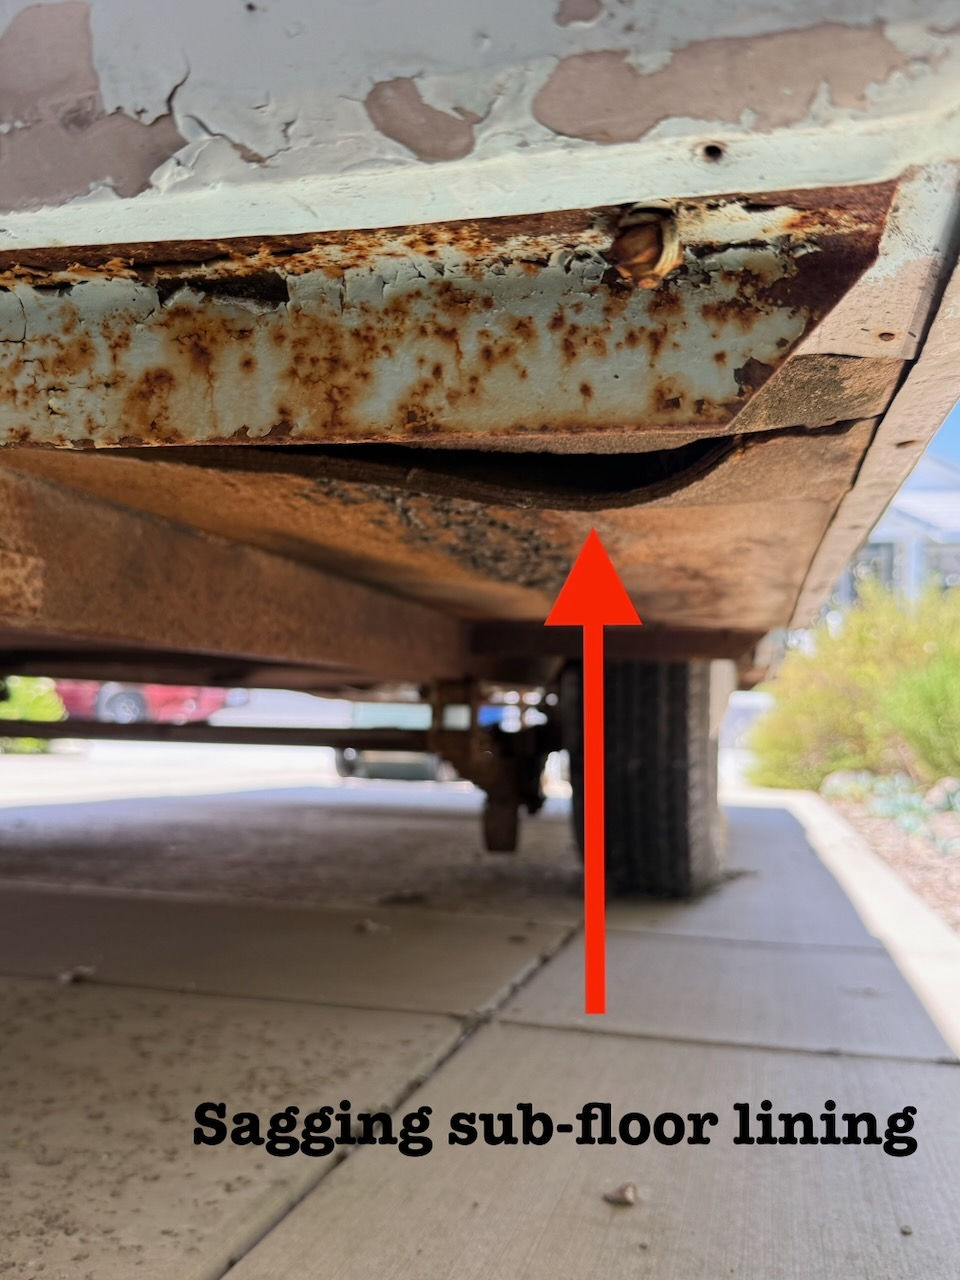
Using your towel or mat, get under the trailer and poke around. Shine the flashlight and poke up into the sub-floor with your ice-pick/screwdriver, looking for soft spots. Wood dry-rot feels soft and spongy, while solid wood feels hard even under the skin (aluminum exterior). Do the same on the skirts (the lower section of each side). This goes without saying, but don't cause any damage to the trailer--you might just tick off the seller and lose out on a purchase.
Manufacturers like this 1956 Aljo (to the left) used particle board in their sub-flooring. It was the "hot" material at the time. Unfortunately particle board doesn't age well. Over time, water soaks into the board like a sponge, dissolving the glue that holds it together. Final result...sawdust. Big repairs!
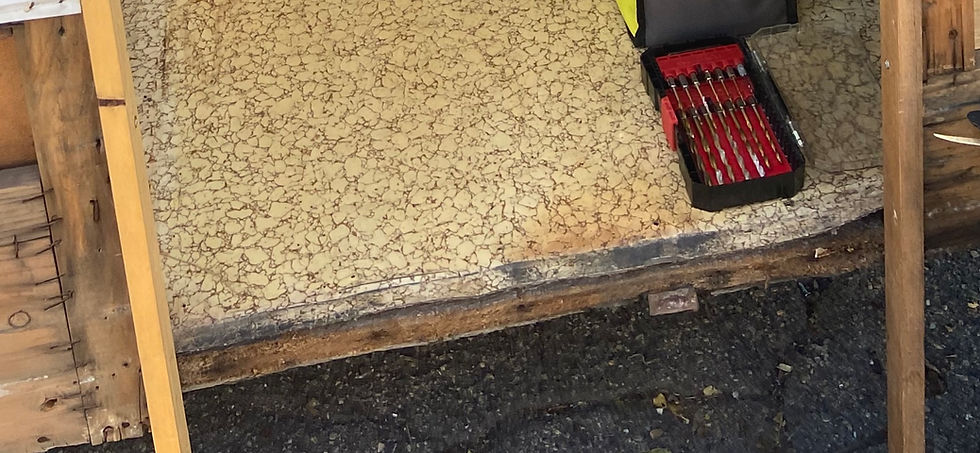
Beware of nice flooring being laid over damaged areas. Yes, it happens. My newest project was basically a sawdust floor (originally particle-board flooring) held together with old linoleum, with pretty new plank flooring laid on top (see pic below). Totally fooled me. Not only did it look fairly decent, it felt solid when walked on, despite the fact that it was disintegrating. This was what was underneath.
If in doubt, ask! Only the seediest of people can look you in the eye and lie to you.
Roof -
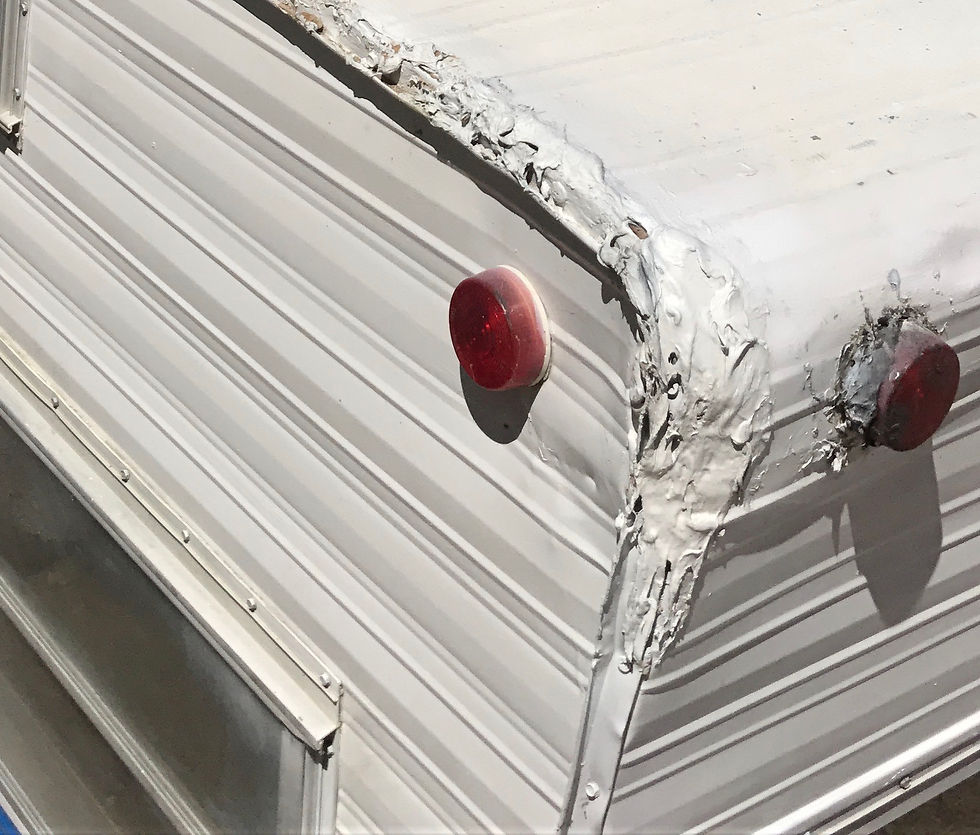
After the underside, get a good look at the roof (if possible). A roof covered in sealing gunk or silicone is a red flag. The goop is horribly difficult to remove and it is also a sign they had leaks they didn't fix properly. Check out the interior ceiling and corners too, on the alert for water stains, dark coloration, mold or fresh paint (which might be covering the water stains).

Exterior Walls & Aluminum - Use your ice pick/screwdriver to tap on surfaces. Beware of spongy-feeling wood, crumbling wood, or aluminum that flexes too much. It is a sure sign of water damage or dry rot. If the wood is solid underneath, the aluminum will also feel solid when you knock on it. You will most likely find a few soft spots, especially on the skirts (lower corners and lower sides), but you don't want it all over or in more than a few small places. Upper and lower corners are the places you tend to see water damage the most, and sometimes under windows & doors. If you have skins that are bursting at the seams, do NOT buy it or attempt to tow it home!
Interior Walls & Paneling -

Rotted interior paneling is pretty easy to identify, but mismatched paneling might be harder to spot (and a sign of water damage that was repaired). Use your ice-pick to carefully poke into seams. It should not slide right in. Hopefully, it hits solid wood. If it slides in easily, you've got rot. I'm not saying don't buy it if it has water damage or wood rot, but you need to carefully assess how much you will need to fix and adjust what you pay for it accordingly. Framing wood is pretty inexpensive, but you have to remove the skin (aluminum exterior panels) to fix it which is time consuming. Interior wood paneling is surprisingly hard to find and not cheap. Most trailers used birch because it is strong, light, and flexes to accommodate for road travel. I renovate with the same materials when feasible. Each 4x8 birch panel can be $23-$25 apiece. That adds up if you need 15-20 panels!
Tires - Do a quick inspection of the tread

and sink a fingernail into the sidewall to check for dry rot. If you can gouge the tires easily, or they are cracking, you should be VERY cautious getting it home and be sure to purchase new tires before taking it out again. Check the date of manufacture of each tire, which is printed on the tire sidewall. It should also be outfitted with trailer tires, not automotive tires (they are not the same). Ask when the bearings were last checked or packed. They should be packed or checked every year for safety.
Electrical System - Ask if the running lights, brake lights (exterior), and interior lights work. Test if possible. If exterior lights don't work, you will need magnetic replacement lights to tow it home (available at most auto parts stores), and know that the fix most likely will involve taking off the skin (the aluminum). Time consuming! If interior lights don't work, the trailer might need a whole electrical system redo (eek). For a professional to fix, that can cost $1000 or more. On a more hopeful note, maybe you know an electrician or contractor.
Appliances - Ask if the stove, oven, refrigerator, and other systems are in working order. Test them if possible. Vintage appliances in matching colors are hard to find, and modern ones don't look nearly as cute (in my humble opinion). Water tanks can be replaced as time allows. Make sure the toilets work there is one. Personally, I prefer simple campers and steer away from anything with a bathroom because I don't want to deal with blackwater tanks or sewage, but that is my personal preference. I have even removed a toilet from a trailer, capped the plumbing and installed a small porta-potty instead for emergencies. If you choose a trailer with a bathroom, make sure you know how everything works and ask the seller how to empty the tanks.
Trailer Registration & Title - It is much easier when the title and registration are current and in-hand. Some trailers have PTI (Permanent Trailer Identification) instead of yearly registration. For missing titles, check with the DMV in your state about how to get a replacement title. Some states are easier than others. California required a notarized form, bill of sale and took a few months to get a replacement title. Make sure you get a bill of sale and have all the seller's information in case you need to contact them for any reason (or to ask the random stupid question). I have found that sellers are usually very attached to their trailers and welcome the odd update or question here and there.
Finally, think carefully about what you have uncovered, and don't be afraid to walk away if it is too much to handle. Get a second opinion if you are not sure. But if you are a brave and hearty soul, and fell in love with the lady, go for it! You can and will learn the skills you need to fix your camper, especially if motivated by love.
These campers are unique time capsules and can contain a random strange treasure or two (I once found a tooth, true story). They are also adorable and everyone will want to talk to you about it at the campground, so get used to it. Restoring them is hard work but great fun. Your new hobby is filled with warm, helpful folks who love to share the stories about their "ladies", offer advice and lend a hand at repairs. Drop me a line and share your story with me, I would love to post your trailer treasures.
As always,💫 Happy Atomic Trails!

Disclaimer
The information provided on this website, in videos, social media posts, articles, or any other materials is for general informational and educational purposes only. It is not professional, legal, or engineering advice. Renovating, restoring, or modifying vintage trailers—and towing them—can involve risks, including but not limited to structural failure, electrical hazards, fire hazards, and injury. You are solely responsible for determining whether any project, modification, or safety procedure is appropriate for your specific trailer, skill level, and circumstances.
Always consult qualified professionals—such as licensed electricians, plumbers, structural engineers, certified trailer repair specialists, or certified RV inspectors—before undertaking any work on a trailer’s structure, electrical systems, plumbing, or towing setup.
By using the information provided here, you acknowledge and agree that:
You assume all risk for any injury, loss, or damage that may occur.
The creators, authors, and publishers of this content are not liable for any damages, injuries, or losses arising from the use or misuse of this information.
Compliance with all local, state, and federal laws, building codes, road safety regulations, and manufacturer specifications is your responsibility.
If you are not experienced in trailer restoration or repair, seek professional help before attempting any work. Safety should always be your first priority.


Comments